Clever Wardrobe Storage Solutions NZ Families Actually Use

You already know storage matters. What you need is a clear plan you can trust, based on layouts that fit Kiwi homes and budgets. I work with families who want smarter reach in wardrobes and built in wardrobe storage that actually makes mornings easier.
To shortcut your research, start by browsing practical wardrobe storage solutions nz options. You will see how modular parts come together, which makes planning simpler.
In this guide I will show you what works for reach in wardrobes, how to plan a built in wardrobe NZ homes can handle, and which organisers give you the most usable space. I will also explain why I recommend Kitset Wardrobes for value, speed, and fit.
How to Think About Reach-In vs Built-In
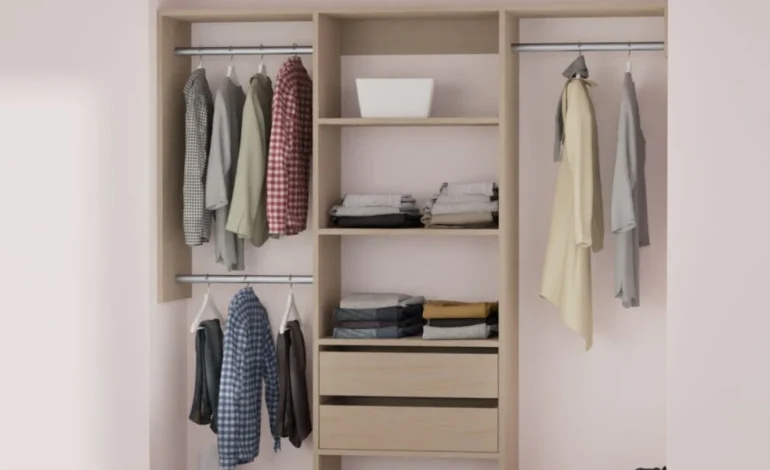
Reach-in wardrobes fit most bedrooms and hallways. They keep floor area free and still give you clear zones for hanging, shelves, and drawers.
Built in wardrobes in NZ are about a tidy, integrated look. You get a stable frame, consistent finishes, and the freedom to set zones that suit your routine.
Both styles can use the same DNA:
- A central tower for drawers and shelves
- Double hanging for shirts, blouses, and kids’ wear
- A single long-hang bay for coats and dresses
- A high shelf for seasonal items
The right choice depends on width, door style, and what you own. The trick is matching parts to how you dress, not the other way around.
Core Planning Rules I Use
Follow these rules and you will avoid most headaches.
- Measure the internal width, height, and depth. Recheck skirting and any nibs.
- Plan zones by clothing type before you pick parts.
- Use double hanging wherever you can. It doubles capacity for everyday items.
- Add at least one drawer bank. Drawers control clutter better than shelves.
- Keep shelves adjustable. Fixed shelves create dead space.
- Place the tower in the middle for sliding doors, or to one side for hinged doors.
- Leave hand clearance near door frames. Avoid clashing handles.
- Use a full-width top shelf if depth allows. It is perfect for storage cubes.
- Choose 400 to 500 mm deep towers for a balanced footprint in most NZ bedrooms.
Proven Layouts That Work
Use these as starting points. Adjust to your exact width.
- 1200 mm reach-in
- One 400 mm tower with 4 drawers
- One side double hanging
- One side single hanging with a low shelf
- 1800 mm reach-in
- Central 450 mm drawer tower
- Double hanging both sides
- Top shelf across the full width
- 2400 mm reach-in
- One 450 mm drawer tower plus one 450 mm shelf tower
- One long-hang bay
- One double-hang bay
- Top shelf full width
These ratios keep access clear while using the full cavity.
Organisers NZ Families Actually Use
Skip novelty items. Choose pieces that earn their space.
- Multi-drawer towers for underwear, tees, and folded knits
- Pull-out shoe trays for frequent pairs, shelves for the rest
- Pants racks if you wear trousers often, or simple shelves if not
- Adjustable shelves for handbags and folded jumpers
- Wire baskets for sportswear that needs airflow
- Valet rail or simple hooks for next-day outfits
- Clear bins on the top shelf for off-season gear
Why I Often Recommend Kitset Wardrobes
I suggest Kitset Wardrobes because they give you a custom look without the custom price. They focus on flat-pack systems that you can tailor and install with basic tools.
Here is what stands out to me:
- Modular parts that mix and match into reach in wardrobes or full built in wardrobes NZ homeowners can fit into most rooms
- Oversized shelves and rails you can trim on site for a precise fit
- A wide range of drawer towers, shelves, and accessories to build a true built in wardrobe organiser
- A 3D planner and custom quoting for unique dimensions
- Fast dispatch and nationwide delivery, including rural solutions
- Clear assembly instructions designed for DIY
If you want reliable wardrobe systems NZ wide, they make it simple to get from plan to install in days, not weeks.
A Weekend Plan You Can Follow
Use this sequence to upgrade without stress.
1. Edit your clothing. Keep what you wear. Store or donate the rest.
2. Measure the cavity and note door type.
3. List your zones: double hang, long hang, drawers, shelves, shoes.
4. Choose a central tower and add hanging to each side.
5. Order modular parts that match your list.
6. Prep the cavity. Mark studs. Check floor level.
7. Assemble and install. Trim rails and the top shelf to length.
8. Adjust shelves to match item heights.
9. Label drawers if multiple people share the space.
Kids’ Rooms and Shared Wardrobes
Small changes make daily life easier.
- Set a low rail for uniforms and everyday tops
- Keep an open shelf at eye level for school gear
- Use clear bins with simple labels
- Choose deep drawers for bulky items, shallow drawers for socks
- Add a hamper space to keep floors clear
- Reserve top shelves for backup bedding and out-of-season clothes
Custom Wardrobe Systems Without Paying for Joinery
You can build custom wardrobe systems by combining individual towers, shelves, and rails. That approach gives you a built in wardrobe storage setup that fits your exact mix of clothing.
I suggest:
- One drawer tower for each adult using the wardrobe
- One long-hang bay per user if dresses or coats are common
- Adjustable shelves for shoes and folded tees if you prefer to stack
- A slim accessory section if ties, belts, or jewellery need a home
This structure adapts as your needs change. Add a tower later without replacing the whole unit.
Mistakes To Avoid
Learn from common pitfalls.
- Too much long hanging. It wastes vertical space.
- Fixed shelves you cannot move. You will regret it later.
- Ignoring door clearance. Drawers need room to open.
- Overlooking lighting. A simple LED strip helps a lot.
- Skipping a top shelf. It is prime real estate for storage bins.
- Choosing deep shelves for small items. Use drawers or baskets instead.
Final Thought
A wardrobe should make your routine simple. Plan your zones first, then choose parts that match how you dress. If you want flexible, budget-smart reach in wardrobes or a tidy built in wardrobe organiser, Kitset Wardrobes offer a practical path from idea to install. Start with a core tower, add hanging and shelves, and trim to fit. You will get a clean, organised space that works the way you do.